This site contains affiliate links to products. We may receive a commission for purchases made through these links. All opinions remain my own.
This year for fall, I knew that I wanted to keep a mostly neutral color scheme with a few pops of orange. I also knew that I wanted to incorporate black and white buffalo check. A few of my favorite fall farmhouse decor items include white pumpkins, fall Rae Dunn mugs, fall pillow covers, and cute wooden signs!
My Fall Entryway
For our entryway, I decorated my antique church pew with buffalo check pillows and this adorable pumpkin patch pillow cover. I also added a fall floral basket that my mom made me!
Sitting Room
I added another cute fall pillow cover in our front sitting room and some fall stems in a galvanized tin. I added this thankful sign that I got for $3 last year in the Target dollar spot on my chippy white table.
Fall Tablescape
In my dining room, I used black and white buffalo check napkins, Rae Dunn plates, and galvanized chargers for our table setting. For the centerpiece, I found these cute lanterns at Hobby Lobby on sale for $3 each and a clearance greenery garland that was only $5! The little white pumpkins are also from Hobby Lobby and were on sale for about $2 each.
Target Bullseye Spot for the win!
Before I found the garland on clearance, I had a Rae Dunn pitcher with eucalyptus stems and this cute little sign that I found at the Target dollar spot as the centerpiece.
Hutch Display
I draped some faux wheat stems on the top of my hutch and kept my tobacco basket and cotton wreath on the top. I added a buffalo check napkin and a cute wood sign (from Hobby Lobby) to keep it simple. I also added a bead garland that I made using these beads!
I’m so grateful!!
A few days later, I received a package in the mail containing this adorable Rae Dunn Grateful pumpkin. It was a gift from an anonymous Instagram follower for hitting a goal of reaching 1000 followers. Thank you to whoever gifted me this! It makes me so happy!
Fall Coffee Bar
I used more buffalo check and some new fall Rae Dunn mugs to decorate my coffee bar. This cute Give Thanks sign I found on clearance for $4 at Hobby Lobby and the buffalo check banner was only $3 in the Target Bullseye Spot!
My Mug Rack
I also added a few fall Rae Dunn mugs and some orange stems to my mug rack to give it a simple fall look!
Built-in Bench
I added these buffalo check pillow covers and another Target Bullseye spot find, this cute pumpkin pillow, to my built-in bench in our living room.
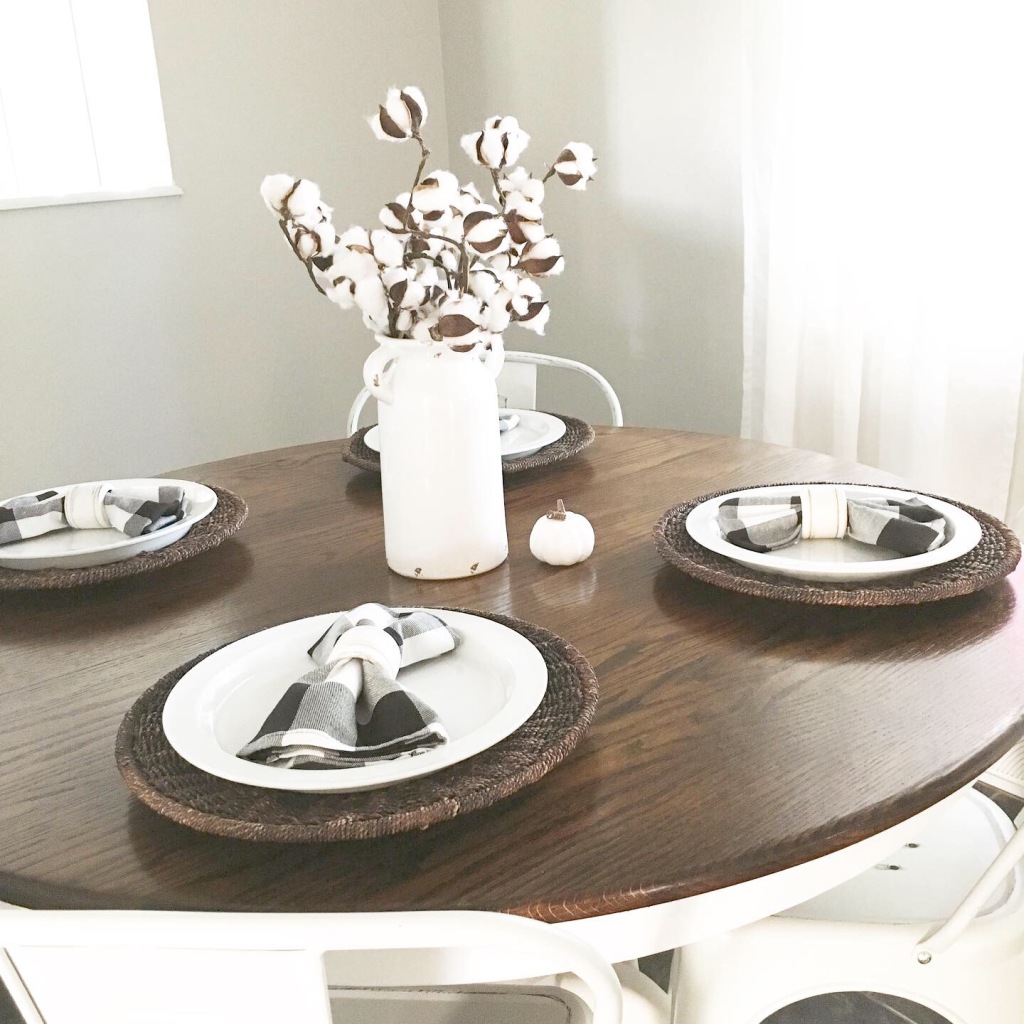
Breakfast Nook
I added some cotton stems, a little white pumpkin, and some buffalo check napkins to the breakfast nook table setting. I like to keep the table setting simple in here because this is where we eat most of our meals!
Hallway Decor
At the end of our hallway, I added an antique window frame (look at that chippy white paint!) and a hand-me-down orange berry wreath. I also added a small black table with some black candlesticks that I found at Goodwill for only $1 each! I love how simple this was and the difference it made to our previously empty hallway is incredible!
I hope you enjoy my fall decor this year! Feel free to comment with any questions you might have! Be sure to follow me on Instagram @faith.and.farmhouse for more farmhouse decorating ideas!
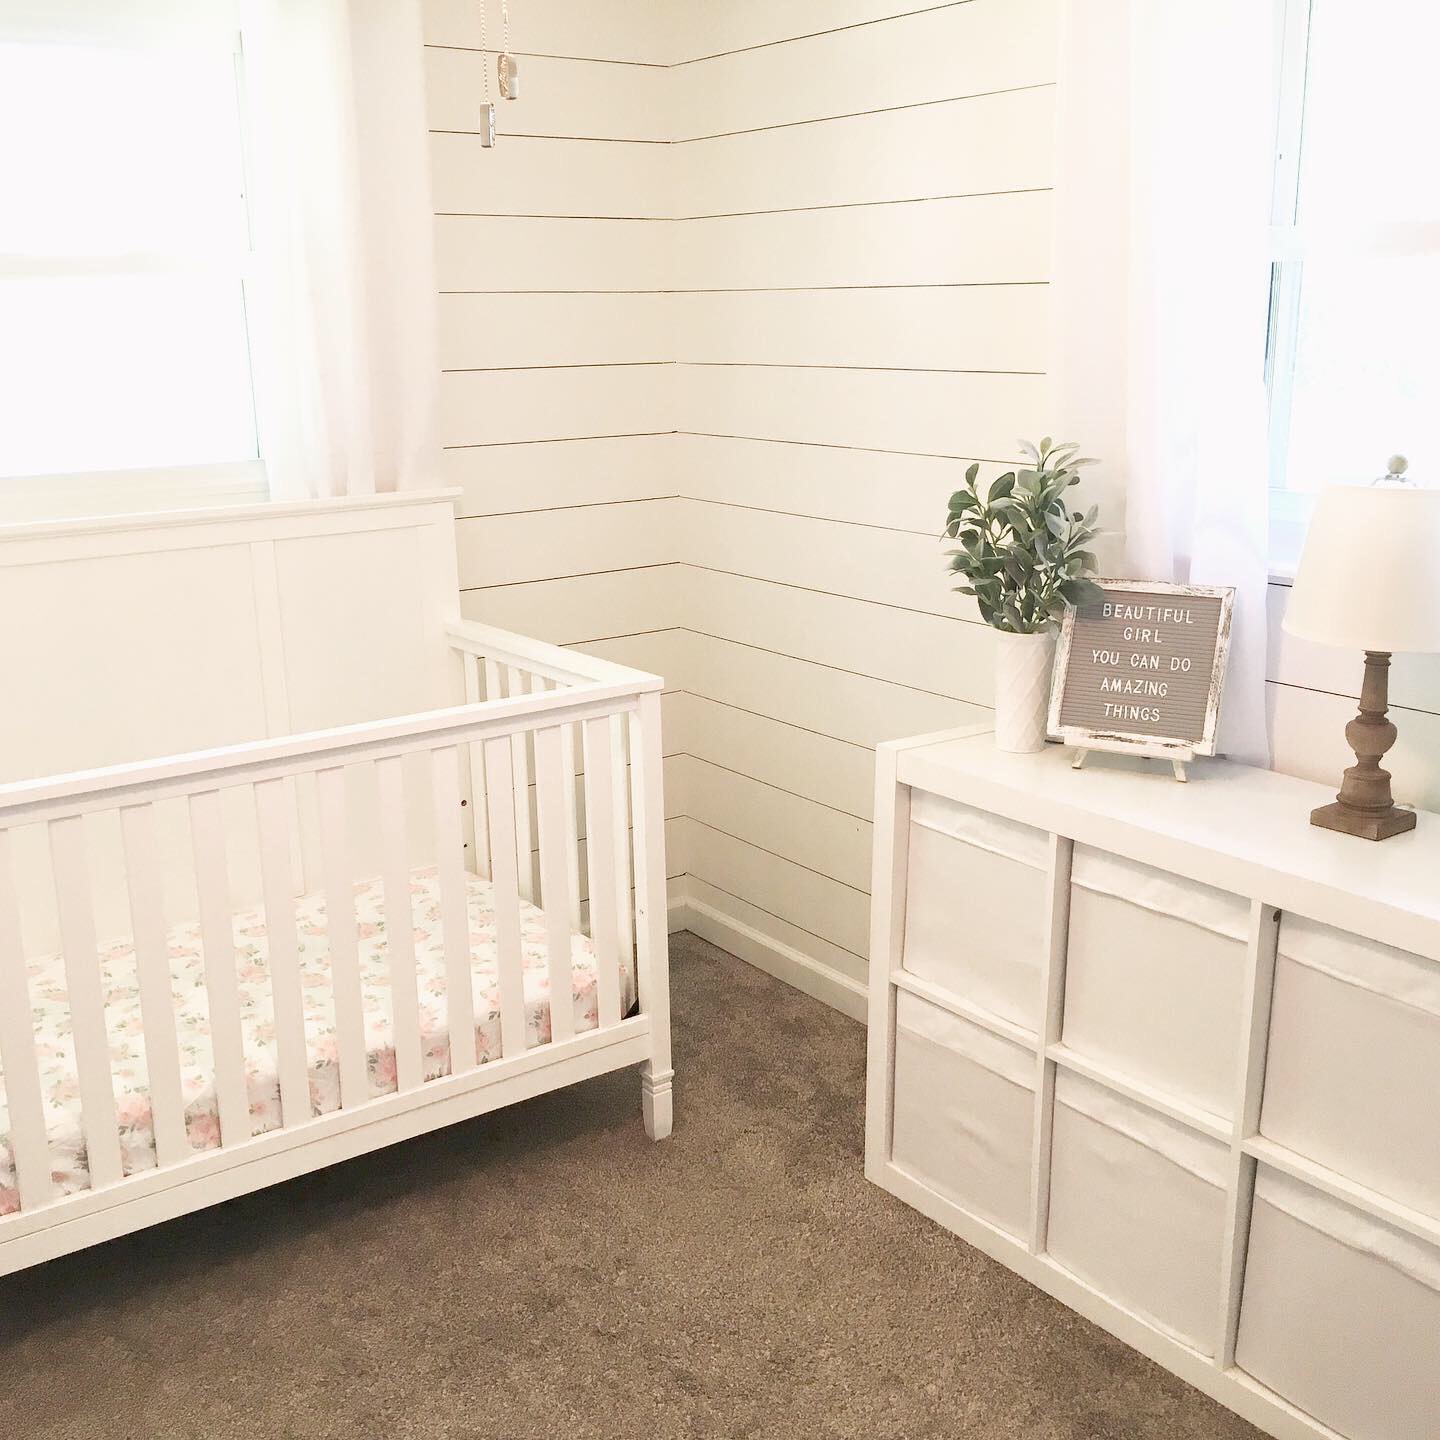
After a year of living in our new home ,I finally got around to giving my daughter’s nursery a much-needed update. When we moved in, we didn’t have the time or energy to paint this room. We had painted a few other rooms in the house and had a ton of cleaning to do before we moved in. By the time it was all said and done, we were too worn out to deal with painting another room! We decided to wait to paint this bedroom until after we’d settled in. That was in June of 2018. It was June of 2019 before it got done. Oops!
Her room was painted a deep tan color and it was so dark and dreary, even during the day. I wanted her room to be light and airy, with a farmhouse feel and simple decor. She already had white furniture and I thought the look of a shiplap bedroom would give her room the farmhouse look i was going for. However, I did not want to spend the time, money, or energy on installing actual shiplap. I had heard of “sharpie shiplap” on Instagram, but I was afraid that it would look too fake. After looking into it more through the hashtag “sharpie shiplap“, I realized that some of the shiplap I thought was actual shiplap was really just sharpie! I also watched this awesome tutorial from @ouridahofarmhouse that was really helpful! My husband liked the idea that if we were to ever move, the future homeowners could simply paint over it if it wasn’t their style. It seemed like the perfect solution!
Taking the First Steps
My first step in giving her nursery the makeover it needed was to get all of the furniture out and everything off of the walls. I painted the entire room white in just one evening. My daughter slept in her pack-n-play in our room that night. With the windows open, the paint fumes had all aired out by the next day.
After painting the walls white, I gathered the supplies I would need to “sharpie shiplap” her entire room. I bought a cheap yard stick, a 4 foot long level with a straight edge, and I ordered Sharpie Paint Pens in Black from Amazon. The paint pens come in a pack of three and I only went through one pen for her entire room! I’ve since started using a second paint pen when I added some “sharpie shiplap” to our master bedroom. They really go a long way!
How to “Sharpie Shiplap”
First, I placed my yard stick vertically against a corner of the wall and, starting at the ceiling, I marked a small mark with pencil every 6 inches all the way down to the floor.
Then, I placed the top straight edge of my 4 ft. level on the first line and pushed the end of the level against the corner of the wall. I carefully drew a line using the sharpie along the top of my level, just as you would draw a line using a ruler.
Next, I went down the wall and drew more lines using the level and the pencil marks. Once I completed a whole row down the wall, I matched my level up to the end of each line and continued drawing. When I got to a window, I simply placed my level across it to continue the line on the other side since it was long enough.
I didn’t think that it would be so easy, but it’s just drawing level lines all around the room! Each line didn’t end up perfect, and there are a couple of places where they may not be exactly 6 inches apart, but overall it looked pretty great and the entire room was “shiplapped” for only $16 (cost of the level and sharpies)!
Deciding on Decor
After all of the “shiplap” was finished, I moved all of the furniture back in and started shopping for decor. I’m not big on going with themed rooms since kids tend to grow out of their likes and dislikes so fast. The white shiplap is very versatile and I can make it go with any color that she wants in her room someday and still make it look great! I knew I needed to add a few girly touches and she loves flowers right now, so I started with that. I found this adorable farmhouse floral crib sheet and based the rest of the decor around it!
I love this crib sheet!
I then found this adorable sign in the 75% clearance section at Hobby Lobby. It matches the crib sheet perfectly! The laundry hamper in the corner was another clearance find from Marshall’s and this cute white scalloped book shelf was a steal for only $7 at my local Goodwill!
The shelf, wall sign, and hamper were all clearance finds!
I used white bins that I had already had from Ikea for her 8 cube organizer. This shelf is so perfect for storage! We even secured a changing table pad to it when she was a newborn. It is the perfect height for a changing table and can grow with her! The lamp was another great Goodwill find for $5 that I used with an existing white lamp shade.
My husband got this cute little letter board from work so it was free to me! I already had the white vase and the lamb’s ear floral came from Hobby Lobby. The white curtains were a set of 4 from Burlington Coat Factory that I found on clearance!
I love this saying!
Overall, I am loving how my farmhouse nursery makeover turned out! I am so happy that I learned how to “sharpie shiplap”! It is so simple and easy to do! Comment below what you think of her nursery or with any questions that you may have. I’m happy to help!
This site contains affiliate links to products. We may receive a commission for purchases made through these links. All opinions remain my own.
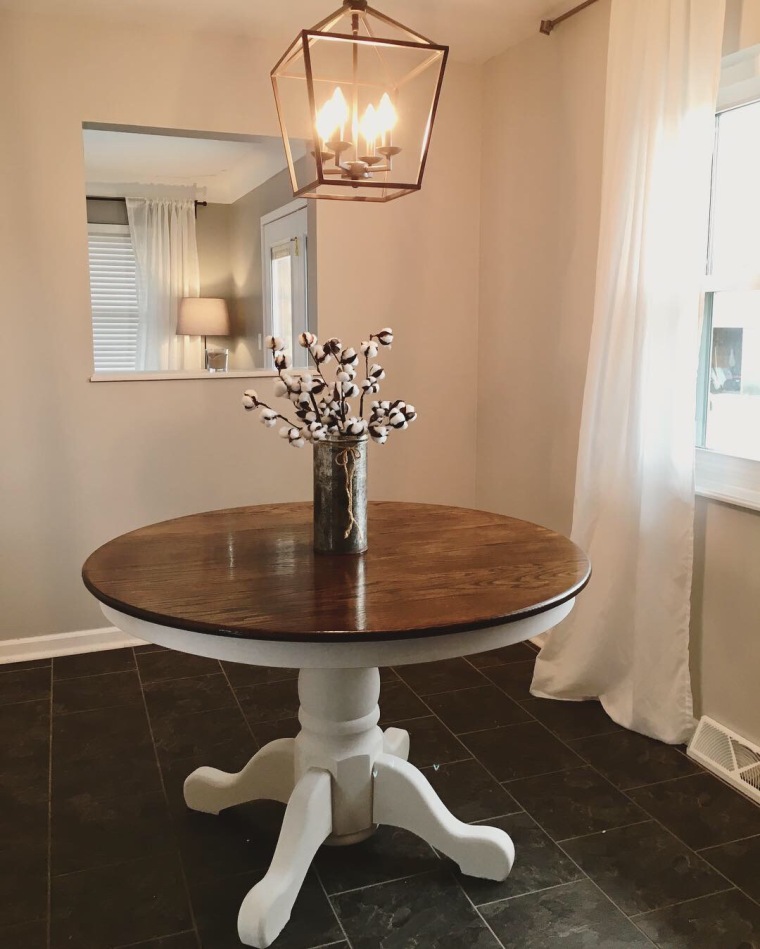
I had never refinished a piece of furniture in my life. What I learned was that refinishing an old oak table, though not exactly easy, was well worth the time and effort.
A Thoughtful Gift
This solid, round oak table was where my husband and I sat and ate many meals, some great, others not so much, during our first few years of marriage. It was a hand-me-down table from my parents. They had it sitting around in a garage and knew we needed a place to sit and eat. We didn’t have too many pieces of furniture starting out. My husband was still taking college classes while working full-time and I had just graduated with a Bachelor’s Degree in Elementary Education and was looking for my first teaching job. Even though it didn’t look the best; the finish was peeling in places and it was stained that orange-ish color that made it look straight from the 90’s, we welcomed this table with thankful hearts.
Time for a Change
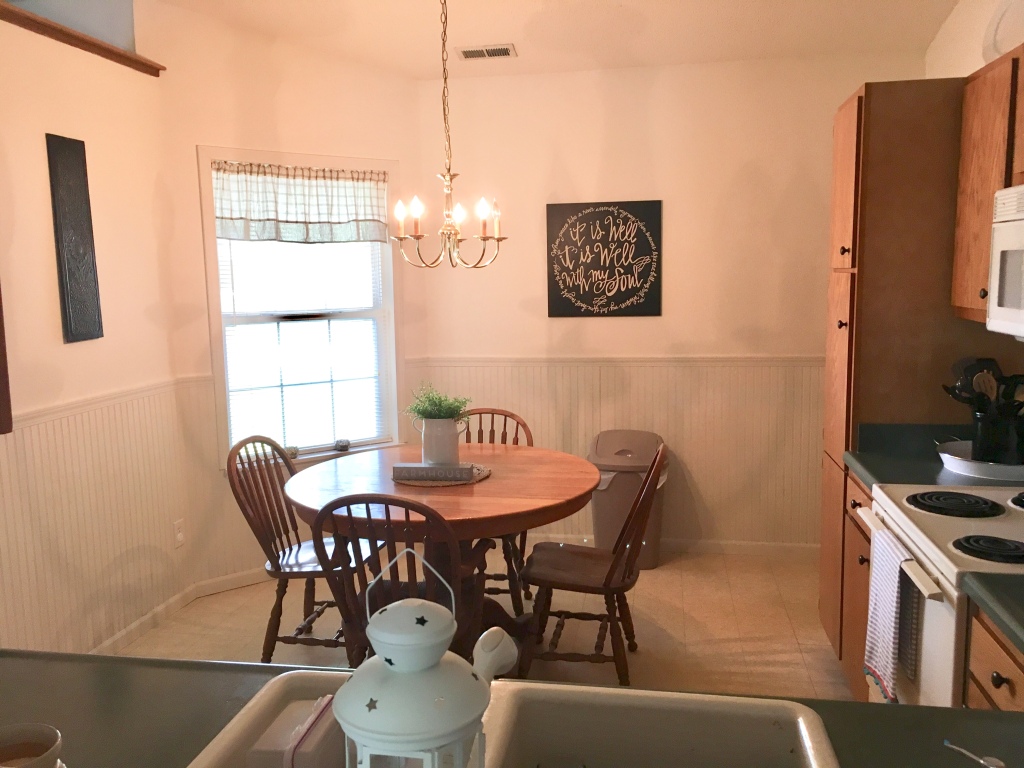
We bought our first house together in the spring of 2018. We had just welcomed our little girl into the world and we were ready to stop renting and buy a place of our own. I knew before we even found our home that I wanted something that I could decorate farmhouse-style. I’ve always loved seeing the transformations that Joanna Gaines does to the houses on Fixer Upper and I couldn’t wait to bring that farmhouse feel into our future home. When our offer was accepted on a home with two dining spaces, an eat-in kitchen and a formal dining area, I knew that it wouldn’t be in the budget to buy two new dining tables. I was going to have to update our current dining table in order to get the look I was hoping for. I had never refinished a piece of furniture in my life. What I learned was that refinishing an old oak table, though not exactly easy, was well worth the time and effort.
The hand-me-down oak table in the dining room of our rental home. I hated those green countertops!
Doing Some Research
First off, I started doing my research into how to refinish a table. I knew that I wanted a white base with a dark walnut stained top. I found another blog tutorial online that proved to be very helpful from @makingitinthemountains. Her tutorial online about how she refinished her kitchen table was exactly what I was looking for! I also found a few other tutorials and googled the basics on sanding and staining. With it being a free, secondhand table, I decided to take a shot and refinish it.
Gathering the Supplies
I knew I wanted to stain my tabletop a dark, deep color. After researching different stain colors and brands, I went with Miniwax Dark Walnut stain. What’s great is most of my supplies for this table are available on Amazon, so I didn’t even have to go out for too many supplies. Click on the images featured to purchase on Amazon.
Miniwax Dark Walnut Stain
After reading something about how belt sanders can leave marks, but palm sanders may not leave as many, I went out and bought a palm sander that proved to be very handy (pun intended).
Black + Decker Mouse Detail Sander
I definitely didn’t have the time to sand the entire table, and I knew that chalk paint allows the paint to stick on finished surfaces without sanding. I purchased a can of Rustoleum’s Chalked Paint in Linen White. I love how easy it is to use!
Rustoleum Chalked Paint in Linen White
I used a cheap foam paintbrush that I had lying around so it wouldn’t show too many brushstrokes, but a good, high-quality paintbrush is all you really need.
To seal the top, I bought a can of Miniwax polyurethane. This is the one I used:
Miniwax Polyurethane in Clear Satin
Sanding
The key to sanding is starting with the most abrasive (lowest number) of grits first and then moving onto the finer (higher number) grits. You’ll want to make sure you get off ALL of the original finish. It needs to get down to bare wood in order for the stain not to look blotchy. It took me at least an hour and a half to completely sand the finish off of the top. I probably should have continued to sand a bit longer to smooth out any scratches, but with a young baby and busy evenings, I didn’t have that much time. I’ve read where you can use stripper and scrape the finish off first but I didn’t have the tools and I chose to just try to sand it down. Overall, it worked pretty well!
The Before Photo of the Table
Staining
After completely sanding the top down to bare wood, I applied the liquid stain using a staining sponge to the top in even strokes going with the grain. Make sure you don’t leave too much excess stain piled up and just sitting there. You can also apply the stain with a clean t-shirt or clean cloths. I used the sponge and wiped the excess up with a cloth. I let it dry overnight. I applied a second coat of stain the next day and waited for it to dry overnight as well.
Sealing
After the stain had dried, I used the polyurethane to seal the top. I was advised to go with polyurethane vs. polycrylic by the salesman at Menards, so I went with it! It has held up so far. Be sure to apply a thin coat and not too thick, otherwise you’ll end up with bubbles like I did. I had to sand down a couple spots where it bubbled up before doing a second coat of polycrylic, which was frustrating. After fixing my mistake, I did two more coats of polyurethane. Overall, I did three coats and it still looks great! Because I was teaching at the time and only getting to work during the evening hours while dealing with dinner, bath time, and bedtime, I waited about a week before I painted the base. This allowed time for the polyurethane to really set and seal properly.
Painting
Painting the base white was the easiest part. I purposefully chose to refinish the top before painting the bottom because I knew that I would drip stain. I didn’t want to paint the bottom white until all of the staining was finished. I painted the base with three coats of chalk paint one evening and it only took me about an hour total. The paint was completely dry the next morning!
It is (re)Finished!
I am so happy that I decided to take a leap of faith and refinish a piece of furniture, staining and everything, all by myself. It looks so much better and has more of a farmhouse feel to it now! I see similar orange oak tables all of the time for dirt cheap at Goodwill, garage sales, secondhand shops, etc. If you’re thinking about refinishing a piece of furniture, I say do it! I now have a beautiful, solid wood farmhouse table that didn’t cost much at all! Feel free to leave a comment and let me know what you think or if I can help answer any questions you may have!
Hello! My name is Krista. I am a Christian, wife, and a mom to a beautiful little girl. I have a passion for decorating and love adding farmhouse touches to our Indiana home. I am a baptized believer and I hope to share the love of Christ to others by encouraging and inspiring others through this blog and on Instagram! Here are a few facts about me:
I am a baptized believer of Jesus Christ and I have a hope and a peace in my life because of all that He has done for me! I hope be a light to others for Him. Although I love decorating my home, I know that my eternal home is in Heaven!
My husband and I met through mutual friends in high school. We started dating in 2011 and we were married in 2015. We just celebrated our 4th anniversary!
I am 26 years old and a mom to a beautiful little one-year-old girl named Emma. She is everything I’ve ever wanted and more.
I have a Bachelor’s Degree in Elementary Education and taught 1st grade for 4 years. I made the decision to stay at home with my daughter, but I loved being a teacher!
I love all things farmhouse-style and I hope to one day build a white farmhouse with a big front porch on a piece of land. The Four Gables plan is my dream!
I grew up listening to country music and love it still! I also have always loved to sing and continue to sing every Sunday on the worship team at my church.
I believe you don’t have to spend a fortune to make something look beautiful when decorating. Most of my decor is from thrift shops, garage sales, clearance items, secondhand, or planned and budgeted for. I rarely ever buy anything full price!
I hope that this blog can encourage you in your faith and inspire you with farmhouse style!